The ability to repair inflatable sleeping surfaces at home represents a cost-effective and convenient solution for minor damage. This method involves utilizing readily available household items or inexpensive repair kits to seal punctures and tears, thereby extending the lifespan of the mattress. An example includes cleaning the affected area, applying an adhesive (such as rubber cement or a specialized vinyl glue), and affixing a patch of similar material over the hole.
The practice of mending inflatable beds offers several advantages, including reducing landfill waste and minimizing the need for frequent replacements. Historically, individuals have employed inventive techniques to repair these items, often born out of necessity and resourcefulness. This approach not only saves money but also promotes a mindset of sustainability and self-reliance. The increasing popularity of outdoor activities and camping has further fueled the demand for accessible and efficient repair solutions.
This article will delve into various methods and materials suitable for at-home repair of inflatable sleeping surfaces. It will explore both temporary fixes and more permanent solutions, along with preventative measures to minimize the occurrence of damage. Furthermore, it will cover identifying different types of damage and selecting the appropriate repair strategy for each.
Effective Strategies for Inflatable Bed Repair
The following guidelines offer practical advice for executing a successful repair, maximizing the lifespan of the item, and ensuring comfort. These tips are designed to provide durable and reliable results.
Tip 1: Surface Preparation is Paramount. Before applying any adhesive or patching material, thoroughly clean the area around the puncture. Use isopropyl alcohol to remove any dirt, oil, or residue. A clean surface ensures a strong bond and prevents future leaks.
Tip 2: Utilize Appropriate Adhesive. The choice of adhesive is crucial. Opt for a flexible vinyl adhesive specifically designed for plastics or rubber. Avoid using general-purpose glues, as they may crack or fail under the pressure and flexibility of the inflatable material.
Tip 3: Employ a Patch of Suitable Material. Ideally, the patching material should be of similar composition and thickness as the original inflatable. Scraps from old inflatable items, or dedicated repair patches sold in kits, are recommended. Cut the patch with rounded corners to prevent peeling.
Tip 4: Apply Even Pressure During Curing. After applying the patch, apply consistent and even pressure for the recommended curing time specified by the adhesive manufacturer. Place a heavy, flat object over the patched area to ensure proper adhesion. Consider using a clamp for larger tears.
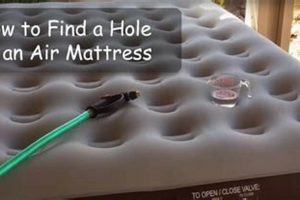
Tip 5: Conduct a Leak Test. After the curing process is complete, inflate the mattress and submerge the patched area in water. Observe for any air bubbles, indicating a remaining leak. If a leak is detected, repeat the repair process with increased diligence.
Tip 6: Consider Interior Patching for Large Tears. For significant tears, an interior patch may provide additional reinforcement. This involves accessing the interior of the mattress and applying a patch on the inside surface to strengthen the repair.
Tip 7: Reinforce Stress Points. Areas around seams and valves are prone to stress and subsequent leaks. When reinforcing these areas, consider applying a layer of flexible sealant or adhesive along the seams to provide additional support and prevent future failures.
By adhering to these strategies, the longevity and usability of inflatable sleeping surfaces can be significantly extended. A well-executed repair offers a cost-effective alternative to replacement and contributes to environmental sustainability.
The subsequent sections will discuss the tools required for inflatable mattress repair and strategies for preventing damage to minimize the need for repairs.
1. Surface Preparation
Surface preparation constitutes a critical initial stage within the process of mending an inflatable mattress. Inadequate attention to this phase directly compromises the effectiveness of any subsequent patching attempt. Contaminants such as dirt, oils, or residual adhesives present on the mattress surface interfere with the adhesive bond between the patch and the mattress material. This interference weakens the seal, resulting in air leakage and premature failure of the repair. For instance, if a mattress used outdoors is patched without first removing embedded dirt and debris, the patch will likely detach shortly after inflation due to the compromised adhesive bond.
The preparation process typically involves a thorough cleaning of the damaged area and its immediate surroundings. Isopropyl alcohol is frequently employed as a cleaning agent due to its ability to dissolve oils and leave minimal residue. Abrading the surface lightly with fine-grit sandpaper can further enhance adhesion by creating a textured surface that allows the adhesive to grip more effectively. Skipping these steps, even when using high-quality adhesives and patching materials, significantly increases the risk of a failed repair. Real-world experience consistently demonstrates that a meticulously cleaned and prepared surface is the foundation for a durable and lasting repair.
In summary, effective repair of an inflatable mattress mandates rigorous attention to surface preparation. This initial step directly impacts the success and longevity of the repair. The process involves cleaning the area with appropriate solvents and, potentially, lightly abrading the surface to enhance adhesive bonding. Neglecting this preparatory phase undermines the integrity of the patch, leading to air leakage and the need for repeated repairs. A thorough and well-executed surface preparation is therefore paramount for achieving a reliable and enduring solution.
2. Adhesive Selection
The selection of an appropriate adhesive is paramount for the success of any inflatable mattress repair. The chosen adhesive must possess specific characteristics to ensure a durable and airtight seal, thereby extending the lifespan of the mattress and preventing further air leakage.
- Flexibility and Elasticity
Inflatable mattresses are subjected to constant flexing and stretching during use. An adhesive lacking sufficient flexibility will become brittle and crack, leading to a compromised seal. Adhesives formulated with vinyl or rubber compounds typically exhibit the necessary elasticity to accommodate the mattress’s movements. For instance, cyanoacrylate adhesives (commonly known as super glue) are generally unsuitable due to their rigid nature, which makes them prone to failure in this application.
- Material Compatibility
Inflatable mattresses are primarily constructed from PVC (polyvin
yl chloride) or similar synthetic materials. The selected adhesive must be chemically compatible with these materials to ensure proper bonding. Adhesives that are incompatible may not adhere effectively or may even degrade the mattress material over time. Specialized PVC adhesives, often containing solvents that slightly dissolve the surface of the material, create a stronger and more durable bond. - Water Resistance
Inflatable mattresses are frequently used in environments where they may be exposed to moisture, such as camping or poolside. The adhesive must therefore be water-resistant to prevent weakening or dissolution of the bond when exposed to water. Waterproof adhesives, formulated to maintain their integrity even when submerged, are preferred for these applications. Water-soluble adhesives are completely unsuitable.
- Curing Time and Strength
The curing time of the adhesive affects the overall duration of the repair process. Adhesives with shorter curing times allow for faster use of the repaired mattress. However, the curing process must also result in a bond with sufficient strength to withstand the internal pressure of the inflated mattress. Two-part epoxy adhesives, while offering exceptional strength, often require longer curing times and may be less flexible than single-component options.
Therefore, appropriate adhesive selection for inflatable mattress repair requires careful consideration of flexibility, material compatibility, water resistance, and curing characteristics. Choosing an adhesive with the optimal combination of these properties is crucial for achieving a long-lasting and reliable repair, thereby maximizing the usability and lifespan of the inflatable mattress.
3. Patch Material
The selection of appropriate patch material directly impacts the success of a DIY repair to an inflatable mattress. The material used for the patch serves as the primary barrier against air leakage, therefore its properties dictate the longevity and reliability of the repair. The inherent connection lies in the cause-and-effect relationship: an inadequate patch material will invariably lead to a failed repair, while a suitable material ensures a durable and airtight seal. For instance, using duct tape, although readily available, will provide only a temporary fix due to its lack of elasticity and its inability to bond effectively with the mattress material. Conversely, a patch made from a similar vinyl material as the mattress, coupled with a compatible adhesive, offers a far superior and longer-lasting solution.
The effectiveness of the patch material is contingent on several factors, including its composition, thickness, and flexibility. Ideally, the patch should be made of the same material as the mattress itself. Repair kits specifically designed for inflatable mattresses typically include patches made of vinyl or PVC, ensuring optimal compatibility. In situations where a dedicated repair kit is unavailable, alternative materials such as sections cut from old inflatable pools or similar items can be employed. The practical application of this knowledge is evident in the improved performance and extended lifespan of repaired mattresses when proper patch materials are used. For example, a camping enthusiast who understands the importance of matching patch material to mattress material can effectively repair a puncture in the field, avoiding the inconvenience and expense of a replacement.
In summary, the selection of appropriate patch material is a critical component of any DIY inflatable mattress repair. The success of the repair is directly linked to the material’s compatibility with the mattress, its flexibility, and its ability to form a durable, airtight seal. While readily available materials may offer temporary solutions, using a patch made of a similar material to the mattress itself ensures the most reliable and long-lasting results. The challenge lies in identifying suitable materials when dedicated repair kits are unavailable, requiring resourcefulness and an understanding of material properties. Prioritizing the quality and compatibility of the patch material is essential for achieving a successful and sustainable DIY mattress repair.
4. Application Technique
The method used to apply a patch to an inflatable mattress critically determines the repair’s efficacy. The process is not merely adhering one surface to another, but rather establishing a secure, airtight bond capable of withstanding internal pressure and repeated stress. A haphazard application, even with superior materials, will likely result in air leakage and premature failure. For example, a patch applied with trapped air bubbles beneath its surface will inevitably create a weak point, leading to eventual separation and loss of inflation. The connection between the materials involved and the physical act of integrating those materials is inextricably linked to the success of a do-it-yourself repair.
A proper application technique includes several key steps. Initially, precise alignment of the patch over the damaged area is crucial. The patch should extend beyond the perimeter of the damage by a sufficient margin to distribute stress effectively. Next, the application of even pressure is essential for uniform adhesion. This can be achieved using a smooth, hard object, such as a roller or spoon, to press firmly across the entire surface of the patch, working from the center outwards to expel any trapped air. Failure to apply consistent pressure will lead to uneven bonding and potential air pockets. Consider the example of repairing a tear near a seam; meticulous alignment and pressure are vital to ensure the patch integrates seamlessly with the existing structure.
In conclusion, the success of an inflatable mattress patch is significantly influenced by the skill and precision applied during the application process. From careful alignment to the consistent application of pressure, each step contributes to the overall integrity of the repair. Neglecting proper technique, even with high-quality materials, compromises the repair’s effectiveness. Therefore, a thorough understanding and diligent execution of appropriate application techniques are essential for achieving a reliable and long-lasting repair of an inflatable mattress.
5. Leak Testing
Following the completion of any attempt at a home repair of an inflatable mattress, rigorous leak testing is an indispensable step. Its purpose is to confirm the integrity of the patch and verify that the seal effectively prevents air from escaping. Leak testing establishes a direct cause-and-effect relationship: a successful patch, properly applied, will withstand testing, demonstrating an airtight seal. Conversely, the detection of air leakage indicates a deficiency in the repair process, necessitating further intervention. Without this evaluation, the user cannot be certain of the repair’s effectiveness, potentially leading to discomfort or complete deflation during use. The practical significance is clear; a camping trip, for example, could be severely compromised if a patched mattress fails overnight due to an undetected leak.
The most common method involves inflating the mattress to its normal operating pressure and then a
pplying a soapy water solution to the patched area. The formation of bubbles indicates the presence of escaping air, pinpointing the location of the leak. Alternative methods include immersing the mattress in water and observing for rising air bubbles. In cases of minor leaks, these techniques can also help identify imperfections in the original manufacturing of the mattress, prompting additional repairs in previously unnoticed areas. Furthermore, leak testing should not be limited to the immediate vicinity of the patch. Other stress points, such as seams and valves, should also be examined, as the repair process can sometimes inadvertently strain these areas.
In summary, leak testing is a crucial validation step in any DIY inflatable mattress repair. It provides empirical evidence of the repair’s success or failure, allowing for corrective action to be taken before the mattress is put into service. The process safeguards against unexpected deflation and contributes to the overall longevity and usability of the mattress. The effective connection lies between the successful repair, demonstrated by a lack of air leakage, and the peace of mind that the mattress will perform as intended. Without a comprehensive leak test, the effort invested in the repair remains incomplete and potentially ineffective.
6. Reinforcement
The concept of reinforcement is intrinsically linked to the longevity and reliability of any do-it-yourself repair to an inflatable mattress. While a patch may initially seal a puncture or tear, stress concentration around the repaired area often leads to subsequent failures. Reinforcement strategies mitigate this risk by distributing stress and adding structural integrity to the repair. The absence of reinforcement can cause a newly applied patch to peel away prematurely, necessitating further repairs or rendering the mattress unusable. The cause-and-effect relationship is evident: inadequate reinforcement results in a weakened repair, while proper reinforcement yields a more durable and lasting solution. For example, a large tear patched without reinforcing the edges is likely to propagate along the perimeter of the patch, especially under pressure. The success of the repair depends on the ability to manage stress concentrations.
Effective reinforcement techniques vary depending on the nature and location of the damage. For smaller punctures, applying multiple layers of patching material, slightly overlapping each layer, can provide added strength. For larger tears or repairs near seams, incorporating a backing material, such as a piece of canvas or sturdy fabric adhered to the inside of the mattress, can distribute stress over a wider area. Edge sealing, using a flexible adhesive sealant around the perimeter of the patch, prevents moisture ingress and reduces the likelihood of peeling. In practice, these techniques prolong the life of the repair and improve the overall performance of the inflatable mattress. A practical example involves reinforcing a valve area, a common point of failure, with a flexible sealant after applying a patch, thereby minimizing the risk of future leaks.
In summary, reinforcement plays a vital role in successful DIY inflatable mattress repair. By addressing stress concentrations and providing added structural support, reinforcement techniques significantly enhance the durability and reliability of patched areas. While the initial patching process seals the damage, reinforcement ensures the repair withstands repeated use and pressure, preventing premature failure. The understanding and implementation of appropriate reinforcement strategies are thus essential for maximizing the lifespan and usability of a repaired inflatable mattress. The challenge lies in adapting reinforcement techniques to the specific type and location of damage, requiring careful assessment and selection of appropriate materials and methods.
Frequently Asked Questions
The following section addresses common inquiries regarding at-home repair of inflatable mattresses. It provides factual information and guidance based on established repair practices.
Question 1: Is the method of patching an inflatable mattress genuinely effective, or merely a temporary solution?
The longevity of a patched inflatable mattress depends greatly on the quality of materials utilized and the precision of the repair process. When suitable adhesives and patch materials, specifically designed for flexible plastics, are used in conjunction with proper application techniques, the result can be a durable and long-lasting repair, extending the lifespan of the mattress considerably beyond a temporary fix.
Question 2: What types of damage are suitable for at-home repair, and which necessitate professional intervention?
Small punctures and tears, typically less than one inch in length, are generally amenable to at-home repair. However, significant damage, such as extensive seam separations or valve malfunctions, often requires professional repair or replacement, as these types of damage can be difficult to address effectively without specialized tools and expertise.
Question 3: Does the type of material of the inflatable mattress influence the repair process?
Yes, the mattress material directly impacts the choice of adhesive and patching material. Inflatable mattresses are typically constructed from PVC or similar synthetic polymers. It is essential to select repair materials compatible with the specific polymer to ensure proper adhesion and prevent degradation of the mattress material.
Question 4: How can the likelihood of future damage to a repaired area be minimized?
Stress concentration is a primary cause of repair failure. Distributing stress across a wider area through reinforcement techniques, such as overlapping patch layers or applying a flexible sealant around the patch perimeter, can significantly reduce the risk of future damage. Furthermore, careful storage and handling of the mattress can prevent new punctures and tears.
Question 5: Are specialized repair kits necessary, or can readily available household items be used?
While readily available household items, such as duct tape, may provide a temporary seal, specialized repair kits containing compatible adhesives and patching materials are highly recommended for a durable and reliable repair. These kits are specifically designed for inflatable mattresses and offer a superior alternative to makeshift solutions.
Question 6: How does environmental temperature affect the repair process?
Temperature significantly influences the curing time and bonding strength of adhesives. Repairs performed in cold environments may require extended curing times, while extreme heat can accelerate the curing process but potentially weaken the bond. It is advisable to perform repairs in a temperature-controlled environment, following the adhesive manufacturer’s recommendations.
In conclusion, the successful repair of inflatable mattresses requires careful consideration of materials, techniques, and environmental factors. When implemented effectively, at-home repair can provide a cost-effective and sustainable solution.
The subsequent section will address preventative measures to minimize damage to inflatable mattresses and prolong their lifespan.
diy air mattress patch
This discourse has explored the fundamentals of addressing damage to inflatable mattresses through at-home methods. Key aspects include proper surface preparation, selection of compatible adhesives and patch materials, diligent application
techniques, thorough leak testing, and strategic reinforcement. Adherence to these principles directly influences the success and longevity of any attempt to mend these items.
The ability to effectively repair inflatable mattresses represents a practical skill that reduces waste and minimizes financial burdens. Continued refinement of these techniques and a commitment to preventative measures will further extend the lifespan of these commonly used items, contributing to both economic and environmental sustainability. The responsibility for maintaining these products ultimately rests with the consumer.


![Best Nemo Air Mattress [Deals]: Sleep Soundly Outdoors Organic & Natural Mattress Buyer’s Guide: Non-Toxic Sleep Solutions Best Nemo Air Mattress [Deals]: Sleep Soundly Outdoors | Organic & Natural Mattress Buyer’s Guide: Non-Toxic Sleep Solutions](https://mattressworldpa.com/wp-content/uploads/2025/07/th-6713-300x200.jpg)

